How does the course designer adapt the difficulty level of a course?
“Yikes! That course is brutal. The course designer really cut loose today. He must have woken up on the wrong side of the bed and decided to take it out on us. This is going to be a disaster.” Have you ever looked a course and thought about saying your final goodbyes to your family and friends? I sure have! It’s all the course designer’s fault. Today, we going to look at the method behind the madness when it comes to course design.
The course designer is like the producer for the entire show. He or she plots out the course, chooses how much time riders are given to complete it, and decides which poles to use. Most importantly, the course designer is the person in charge of making sure the difficulty of the course matches the skill level of the riders. In sum, he or she is responsible for the show running smoothly. A course that is too difficult could ruin the confidence of less experienced horses or riders. On the other hand, if it’s too easy, the show isn’t exciting to watch. So, how do course designers make sure the jumps are just hard enough? Well, there are a wide variety of strategies. Some are obvious, such as the height of the fences, the number of jumps and lines, and the time limit, but others are much subtler. We’ll take a look at the latter today’s article.
Table des matières
Number of strides
Depending on your level, you’ve probably already had to deal with impossible questions like “Should I do that in six strides or seven?” But have you ever wondered why the course designer decided to place the two fences at that distance in the first place?
To answer that question, let’s separate distance into two categories. The red line indicates takeoff and landing, while the blue line shows the number of strides.

In the blue area, the course designer takes into account several factors, starting with the average length of a canter stride (12 feet). However, that distance can vary widely depending on the horse’s body shape and movement as well as a number of other factors. The course designer will also take into account:
- Quality of the footing—the stride will be shorter in deep footing
- Incline—along the backside of a hill, the horse’s stride will be longer than it was going up
- Position of the gate—in any line that heads home, the stride length will tend to be longer
- Fence number—stride length increases throughout the course
The number of strides must also take into account takeoff and landing distances, which also vary! They primarily depend on the height and width of the fence, but are also influenced by the horse’s speed at the approach. That’s why we slow down when we’re heading into a shorter line. If we look at fence height, raising a vertical from three feet to five feet increases the width of the takeoff and landing distance by nearly three feet.
- For a three-foot fence, the takeoff distance is around five feet away from the base of the jump, and the landing distance extends 5.7 feet past that point for a total distance of around 10.5 feet.
- For a five-foot fence, the takeoff distance is six feet, and the landing distance is 7.2 for a total distance of 13 feet.
The course designer will take all these factors into consideration when setting up lines and distances. He or she might make the course more difficult by adding distances that require a bigger stride or, on the contrary, the course designer might opt for normal distances. Dealing with these challenges takes training. In the rest of the article, we’ll take a look at some simple exercises you can use to get ready for your next show.
Fence design
The design of the jumps also determines the difficulty of the course. For example, the width of the front of the jump is important since a horse might find it easier to swerve to the side if the fence is angled. Jump fillers and liverpools might worry the horse, causing it to shorten its stride and change the rider’s plan (especially if there’s a set number of strides after the jump).
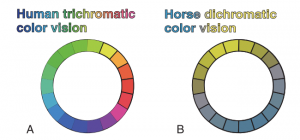
The course designer might also alter the color of the jumps. Horses don’t see colors in the same way as humans. Broadly speaking, our eyes contain three types of light receptors—one that sees blue light, another that detects red light, and a third for green light. In other words, we have trichromatic color vision. We see a range of colors due to changes in the quantity of light received by each type of receptor. Horses, however, only have two types of receptors, or dichromatic vision, since they lack the ability to see red light. Their color perception is completely different than ours. Horses see the world in pastel shades of brown, yellow, blue, and gray. In humans, this type of vision is called color blindness. Here’s more or less what a horse sees:

Horses have a hard time distinguishing colors. A study on fence color found that green and yellow jumps incurred the most faults. Because yellow is a mix of green and red light, the horse can’t tell the difference between the two colors and mistakes the fence for the ground, which is either green if the course is grass, or yellow if it’s on sand.
Bending lines
Bending lines also increase a course’s difficulty level. The horse’s spine doesn’t allow for a lot of lateral flexibility.

The diagram shows the findings of Hilary Clayton’s studies on the maximum degree of flexibility between each vertebra. We see that while the angle is practically 90° between the skull and the first vertebra, the area beneath the saddle can only move between 5° and 10° to either side. In a hunter or jumper course, the horse cannot curve its spine enough to follow the bending line. Instead, it will lean to the side, making it difficult to maintain speed and engagement. The course designer might make the course harder by adding tighter bending lines or by shortening the time limit to force you to take harder turns.
Training exercises
Exercise #1: Required stride lengths with ground poles
When it comes to getting ready to deal with the various stride lengths the mean course designer will give you, there’s nothing better than training at home over ground poles or small jumps. Macha got in on the fun with an exercise on stride length that you can find here.
Macha put out two ground poles placed 20 meters apart, then cantered through with 4, 5, 6, 7, or even 8 strides. You can make it even tougher by switching between four and seven strides (or seven and four) to give you even greater control over your canter strides.

Exercise #2: Cloverleaf
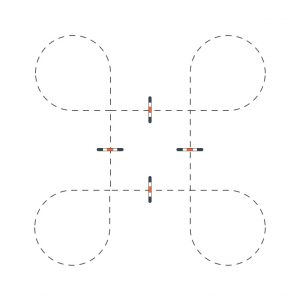
This exercise is perfect for practicing tighter curves. You’ll jump a pattern of four ground poles or four small jumps with a smaller and smaller circle between each obstacle. (Exercise from 101 exercices de sauts d’obstacle, Belin).

Exercise #3: Slicing the jump
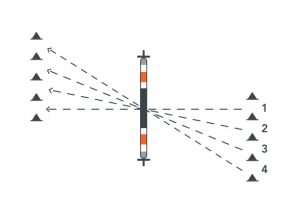
Slicing your fence can be useful when the course designer decides to make a super-fast course! Start with a straight approach, then slowly start to slice the fence, as shown in the diagram below. Cones can help you stay straight even though you’re jumping at an angle. Try to always have two or three straight strides between the end of your bend and the base of the jump.

Now you have everything you need to understand your course and sail through any traps the course designer decides to set in your path. Time to saddle up!
Alice Martinez,
R&D Director at Equisense