4 Dressage Exercises to Gain in Control and Precision
Showjumpers, don’t run away. This article is made for you too! A jumping course is 90 % on a flat surface and only 10% in the air, you know! So let’s diverge a bit from our daily routine with these 4 dressage exercises to gain control and precision. 👌💪🏻

Table des matières
Exercise #1 – Circle, diagonal, ride down the centerline, leg yield
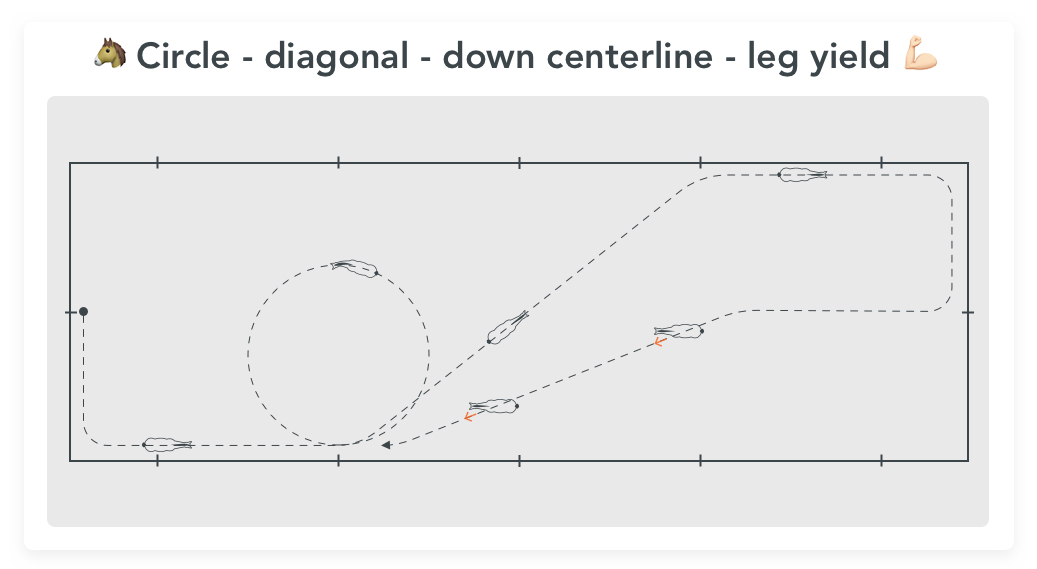
Let’s start with a little exercises you do at trot. Start with a 12 m circle, then a little diagonal at trot trying to lengthen the stride. Proceed by riding down the centerline and leg yield so you don’t change hand. So if you were on the right hand, do a right leg yield.
Do this little exercise at both hands until you are comfortable with it and you movements are fluid, precise and supple.
🦄 Showjumpers, this will help you work on your horse’s suppleness thanks to the 12 m circle and the leg yield. Working on this will also allow you to check that your horse reacts to your aids and that its hind legs are working under the mass.
Don’t see the leg yield as an exercise in itself but rather as a way to control the suppleness and the reactiveness your horse has to your inside leg.
Lastly, doing all 3 of these steps will (re)teach you to be precise on your directions, which is a must to jump a course.
Step 1 – How to make a good circle? 🧐
A good circle… is a round circle! 🥔 You can start with a few cones or ground poles to have a little help drawing the perfect circle.
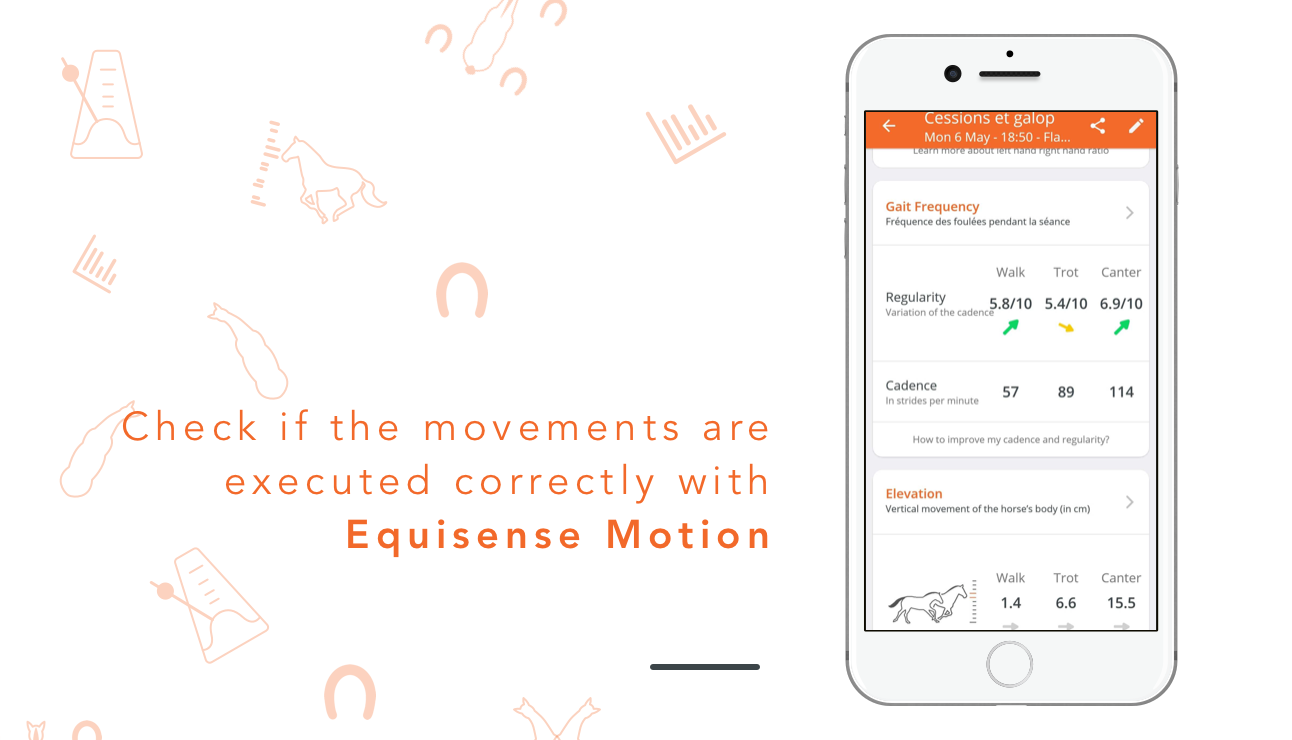
The trot has to be regular and active! There shouldn’t be a change between trotting in a line or trotting on the circle. This means that the cadence shouldn’t go up (which would mean your horse is rushing) or down (which would mean your horse is holding back). Don’t hesitate to use your Equisense Motion to measure your horse’s regularity.
A good circle also means a horse with a good bend, not too much inside. The horse has to adopt the shape of the circle, from head to tail.
💡Small reminder on circle aids [1]
Right now you’re thinking “Does she really think I can’t do a circle? 🤨”. Maybe it will only be a reminder for you, but it could teach you some things!
✅ The two reins
The inside rein is your leading rein, away from the inside of the circle. The hand doesn’t move. Its role is to ask for or to maintain the circle. This rein has to be able to get looser. If it isn’t the case, your horse isn’t supporting its own weight. The outside rein needs to stay in place. The wrist is the continuation of the forearm. Its purpose is to control the movement.
If your horse’s inside hind leg is working under the mass, then the outside rein will automatically get tension. You can eventually support the rein upwards if the movement asks for it (too much bend…).
✅ The two legs
The inside leg is very important. It needs to stay at girth level and not go further back. It “acts intermittently (not stuck to the horse’s body) and not repetitively (not every stride)”. Be careful not to let it go further back (makes the hip go outside) or to not let your heels ride up.
The outside leg acts less. Position it slightly back from the hip down (and not only from the calf) to maintain the horse’s hips in place. “Its is weaker if it doesn’t have to correct the incorrect informations sent by the three other aids (contrary hand actions or in opposition, inside leg back…).”
✅ The rest of the body
Keep your pelvis supple, even on a small circle. “The action from your legs shouldn’t hinder the mobility of the pelvis”. The eyes and the shoulders are oriented on the circle.
Step 2 – How to make a good diagonal at medium trot? 🤔
A good medium trot diagonal is a diagonal in which the horse is and remains straight. No bend here! The horse stays in a line and doesn’t zig-zag.
The extension is good when the horse steps under, the strides lengthen so the horse increases its scope but not its cadence! Once again, the Equisense Motion will help you figure out if the cadence changed a lot or if it mostly stayed the same.
A good extension also means the horse stays supple and carries itself (the horse adapts its attitude: head-neck angle slightly more open, nasal bone slightly over the vertical). Don’t ask for too much at once. Start with 3 good extended trot strides before asking for 50 meters!
Your pelvis has to stay mobile! The horse can’t extend its gait if your pelvis is in the way of its movement. If you wish to do the extension at rising trot, do it once the extended trot is established.
Step 3 – How to make a good leg yield? 🤔
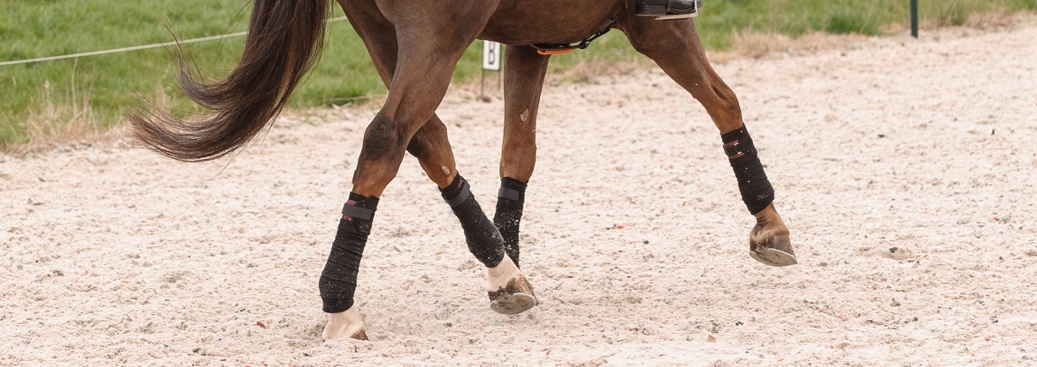
A good leg yield is one in which the horse stays straight. This means the hips don’t go before the shoulders in the movement. The neck and the head oriented correctly and the horse is parallel to the side of the arena, with no bend or a small bend to the outside (but that bend isn’t a goal of the exercise).
The hind legs are engaged under the horse, and crossing. The horse reacts quickly to your aids.
Both cadence and the elevation at trot have to be as regular as possible. The horse has to stay elevated in the yield. Once again, the Equisense Motion will help you see the changes.
💡 Small reminder on leg yield aids
For a left leg yield, so a movement to the right, your eyes and your shoulders are oriented towards the movement. Despite that, your body needs to stay centered. “It’s useless to move your centre of gravity to add weight to the movement. The horse has to move, and moving your body will unbalance the horse.” [2]
Hold the horse between the reins to move the shoulders. Don’t let your left rein go above the neck.
“In a left leg yield, towards the right in a diagonal, the inside leg (left) stays at girth level. It takes action in an ad-hoc manner to incite the horse to move to the right while staying parallel to the side of the arena. In the case of a satisfactory answer from the horse, it’s important that it relaxes to avoid boring the horse. If you keep pushing for the exercise, the horse may lose its reactiveness and impulsion.” Camille Judet-Cheret [3]
The leg pushing the horse stays a girth level and acts intermittently. The right leg maintains the right impulsion and only acts when necessary.
Exercise #2 – Canter curved line
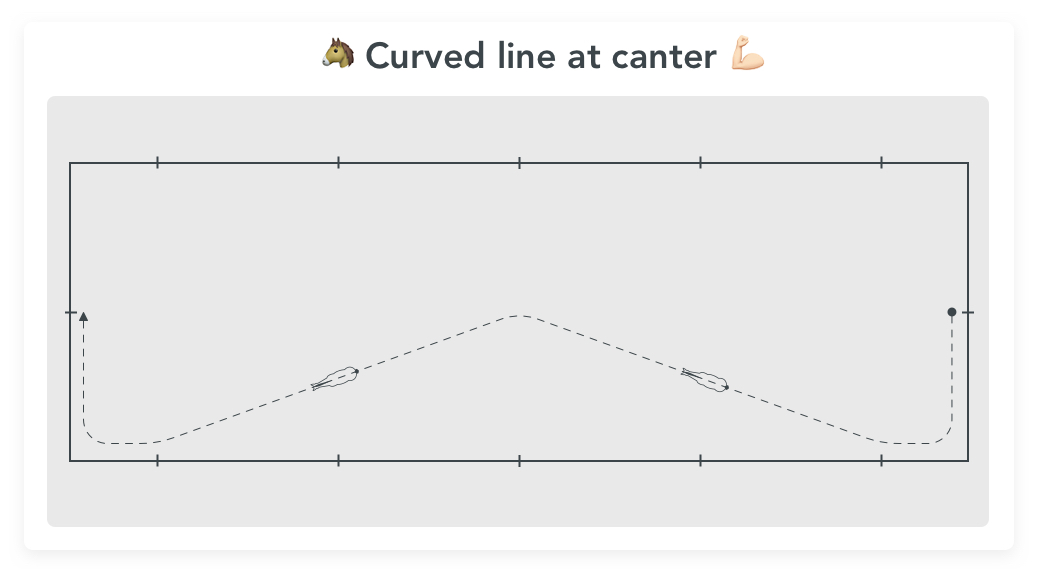
The second of these four dressage exercises will be the curved line at canter.
Start with a curved line until the quarter line and, once you’re comfortable, reach the middle line.
🦄 Showjumpers, it’s an essential exercise to master for you! Indeed, it’s really important to keep control of the canter and its quality during your courses. You have to be able to move the horse smoothly on curves at canter or counter canter so this curved line is a perfect exercise! Counter canter is a proof that your horse is balanced and supple and both of these qualities are important when jumping.
How to make a good canter curved line? 🤔
A good curved line is first and foremost a horse that doesn’t change leads and that is balanced. It’s also important to have a smooth curve, with a precise path. And lastly it’s a straight horse, that stays with a great canter quality throughout the entire exercise. The horse has to be relaxed and supple.
Like I said before, the canter has to keep the same quality during the whole exercise. The cadence and the elevation shouldn’t change!
💡 Small reminders on curved lines
To make a successful curved line, start with a smooth canter, with enough motion to keep the horse from falling back to trot. Start as if you were going on a diagonal, the horse straight between your reins and legs. The direction change happens when you reinforce your inside leg and your outside rein action, to bring the horse to straightness and go back to the track. Your seat is supple and smooth, while your leg acts to maintain the movement and the canter quality.
Start with a lighter direction change, and gradually increase the difficulty.
📚 Read more: How to warm up your horse correctly
Exercise #3 – Canter circle, diagonal, transition to trot
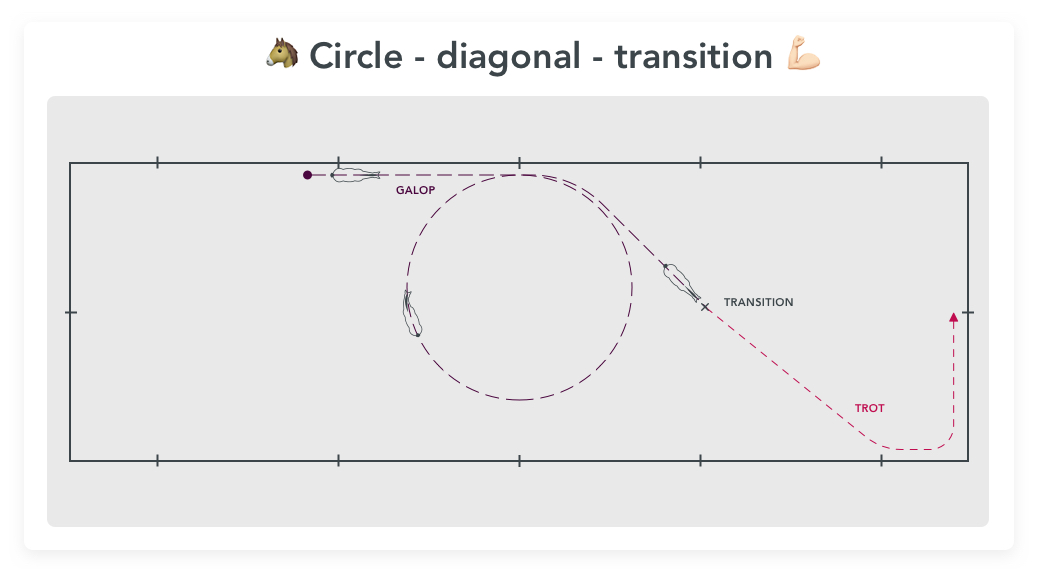
Third exercise, trot transition on a diagonal. At canter, start with a 15 m circle and, immediately after the circle is done, go on a small diagonal. In the middle of this diagonal, transition to trot.
🦄 Showjumpers, the control you need to ride a course is brought by your aptitude to master both the direction and the gait changes and the rectitude of these changes.
How to make a good canter to trot transition? 🤔
A good canter-trot transition is a smooth transition with enough energy but not too much, which would cause the horse to rush the transition. The trot should immediately be cadenced. The transition has to be made with a straight horse, installed right between both reins. The horse goes straight before, during and after. It doesn’t deviate from its trajectory. Don’t hesitate to put ground poles as a lane to help you visualize the diagonal.
The transition should be forthright and short. The trot is good from the first strides on.
💡 Small reminder on transition aids
When you approach your transition, puff yourself up. Don’t hesitate to take a deep breath as you ask for your transition!
“A deep breath helps the rider puff up, bringing balance to their horse. Once the transition is successful, relaxation and exhalation immediately make the rider and the horse relaxed to welcome the movement of the new gait.” Camille Judet-Chéret [4]
Let your legs loose and halt your pelvic movement at the same time you puff up your shoulders. Your horse will be brought to trot. If need be, apply a bit of pressure on your reins to make your horse transition.
Once the horse is at trot, you have to immediately relax to let the trot be active and avoid a pause in the trot. The transition has to be smooth!
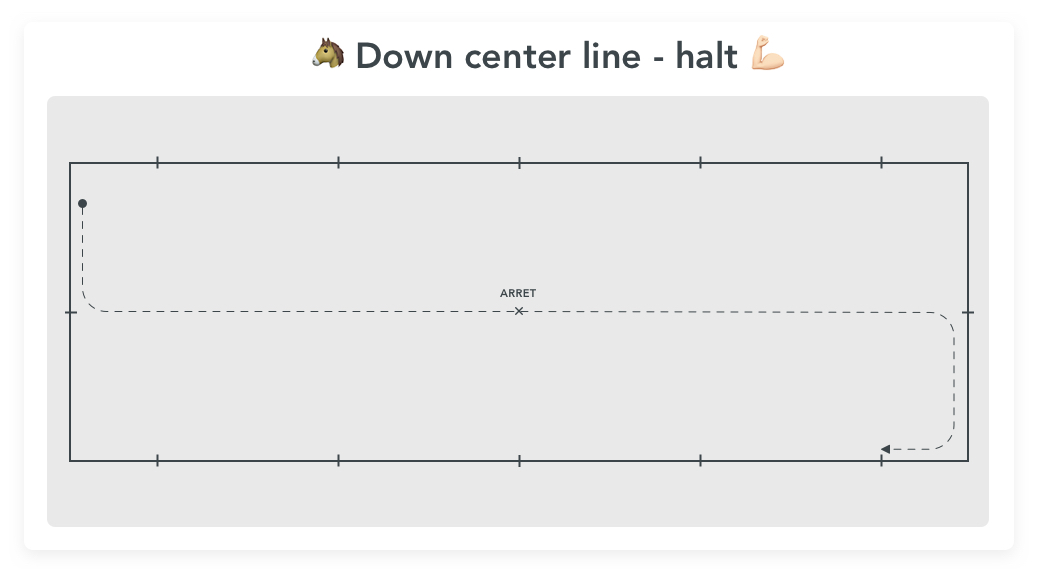
Exercise #4 – Ride down the centerline – halt
Last one of these 4 dressage exercises to improve your control, the infamous down centerline – halt.
If it is a typical dressage exercise, it’s still really important to work on it: it’s the perfect exercise to make sure your horse is straight between your reins!
🦄 Showjumpers, being able to go straight and have a horse tense between both reins is absolutely necessary for every horseback sport! And you’ll see, it’s pretty easy to do (but difficult to do well) and it can occupy you for a little while. Handy when you’re lacking ideas 😉
How to make a good Down Centerline? 🧐
A good ride down the centerline comes with a horse straight from start to finish! The horse has to be responsive between your two reins. Don’t hesitate to part your hands further from the usual, and keep them low. Use your legs rather than your hands to prevent your horse from deviating.
A good down centerline is also a horse with a consistent cadence! Once again, don’t hesitate to use Equisense Motion to make sure the strides are regular 🙂
Also, a small tip: when I used to show in Dressage, I did my first ride down the centerline at medium trot. Firstly because I found it easier to go straight at medium trot, and also because it was an entrance with a lot of energy and it forced me to keep an active trot for the whole Dressage test! This only works if your horse has a nice medium trot, otherwise the ‘wow’ effect is kind of ruined 😅.

Here you go! You have plenty of new exercises to try, and you’re going to improve with a responsive horse. You’re almost ready to go on a dressage test! Isn’t that nice?? 🤩
See you soon for another article,
Camille Saute
Equisense Co-founder.
Bibliography
[1] Galloux, P. (2018). Les aides du cercle. Retrieved January 21, 2019, from Equipaedia website: https://www.haras-nationaux.fr/information/accueil-equipaedia/equitation/le-dressage-du-cheval/les-aides-du-cercle.html
[2] Pierre, B., Sanson, N., & Genoux, N. (2018). La cession à la jambe. Retrieved January 21, 2019, from Equipaedia website: https://www.haras-nationaux.fr/information/accueil-equipaedia/equitation/la-pedagogie/la-cession-a-la-jambe.html
[3] Judet Chéret, C. (2018). TECHNIQUE DRESSAGE : CESSION À LA JAMBE, MODE D’EMPLOI. Retrieved January 21, 2019, from Pamfou Dressage website: http://www.pamfou-dressage.com/fr/technique-dressage-cession-a-la-jambe-mode-demploi/
[4] Judet Chéret, C. (2018). TECHNIQUE DRESSAGE : De l’importance des transitions. Retrieved January 21, 2019, from Pamfou Dressage website: http://www.pamfou-dressage.com/fr/technique-dressage-de-limportance-transitions/